By Advanced Flyer @firstquadcopter.com

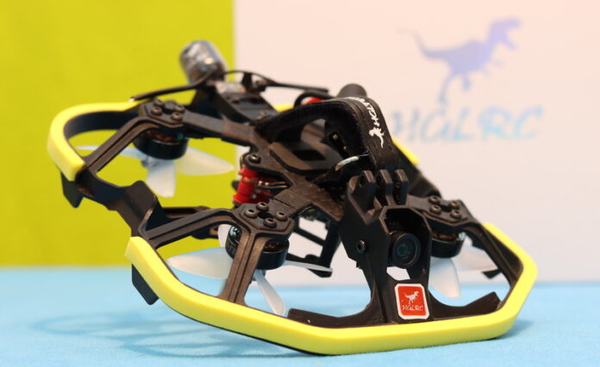
When I was a kid, I always wanted to drive a go-kart but somehow missed the opportunity till now. Maybe the HGLRC GK20 has propellers instead of wheels but when you put the FPV goggles on your head and give some throttle the fun is about the same :)
HGLRC is a very active player in the FPV market that is working hard to surprise the community with new design concepts. They have a wide range of FPV drones including micro Whoops and 7″ long-range quads. While the RaceWhoop30 is designed to carry a full-size GoPro camera, the KT20 Whoop is for ultra-light cams such as the Insta360 GO 2 or Caddx Peanut.
The HGLRC KT20 has been released with two different FPV systems. While the 5.8GHz analog edition has a Caddx Ant Eco camera and Zeus Nano 350mW VTX, the digital version has a Caddx Polar Vista kit.
HGLRC KT20 highlights
- Cool and unique go-kart shape design;
- Foam padding with 3 color options (red, blue, and yellow);
- Analog and HD digital versions;
- Zeus10 AIO flight controller;
- AEOLUS 1303.5 4500KV motors with Emax Avan Micro 4 leaf 2″ propellers;
- Caddx Ant Eco analog or CADDX Polar digital camera;
- Zeus Nano 350mW 5.8GHz analog VTX or Caddx Vista digital VTX;
- Can carry an Insta360 GO 2 or Caddx Peanut camera;
- LED light bar for cool night flights;
- XT30 battery plug, 4S compatible (550mah-850mah recommended).
HGLRC KT20 drone in-depth review
Disclosure: I received this 2″ racing quad as part of a product review collaboration with HGLRC. Product specs and quality may vary according to the manufacturer’s reliability, so I cannot guarantee that you will get a drone that performs the same as seen in my article.

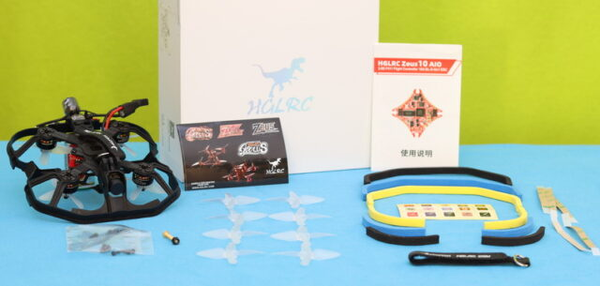
The KT20 Go-Kart is packed in the same minimalist white box as most of HGLR’s drones, with the following accessories: 3 sets of foam bumpers (black, blue, and yellow), 2 sets of spare propellers + screws, spare battery velcro, and some stickers (logos and numbers).
First impressions
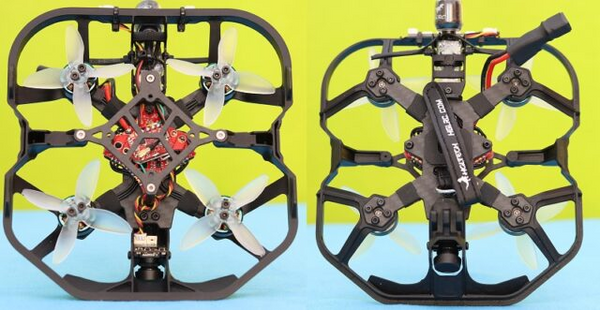
Holding it in my hand, it fills solid and well build. I like that the frame structure is airy, everything is visible and accessible for easy maintenance. All the wires are nicely routed and secured. The top plate that holds the AEOLUS 1303.5 5000KV motors in pusher configuration has 2mm thickness, and the base plate has 1.5mm. Between the carbon fiber sandwich, there is a unibody plastic protective guard. For extra protection, it is recommended to install the included foam bumpers around the guard’s edges. The design can be customized with the included stickers.

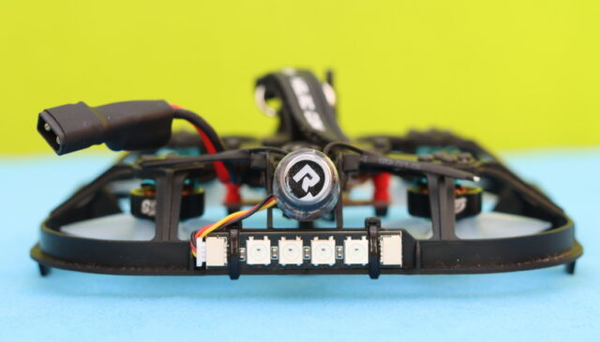
On the back, there is a programable status RGB LED bar that makes your flight more eye-catching for your spectators. That LED bar is also handy when you practice line of sight (LoS) as it indicates the orientation of the drone.

Without an additional camera and battery, the KT20 weighs about 85 grams and measures 138x130x35mm. With an Insta360 GO2 and a 4S/650mAh battery on top weighs 207 grams, so still way under 250 grams (0.55lb). The battery is installed on the top of the frame in a perpendicular position.

The FrSky R-XSR was installed on the tail near the Hammer FPV antenna with easy access to the F/S bind button. The RX antennas were nicely secured to the frame.

Price, availability, and options
The KT20 is listed on HGLRC’s online store with a starting price of $159.99 for the analog version and $269.99 for the digital edition. According to the radio receiver you choose, you can pay up to 32 extra bucks. If you want to build your own flying go-kart, the KT20 frame kit is available for $18.99.
Flight controller
The HGLRC KT20 is built around the F411 Zeus10 AIO flight controller with integrated 10A BLHeli ESC and 3 UART ports. The FC is installed on rubber grommets and can be powered from 2S to 6S LIPO batteries (motors are limited to 4s!!!). On the XT30 battery plug, is installed a low ESR capacitor. The FC has a micro USB for firmware upgrade and customization.

All parts (VTX, RX, and motors) are directly soldered to the flight controller board. Does not have a dedicated connector for Caddx Vista.
HGLRC KT20 – FPV system
I received an analog version with a Caddx Ant Eco camera and Zeus Nano 350mW VTX. The nano-size Ant camera has a 1/3″ CMOS sensor with a resolution of 1200TVL and 165° field of view (FOV).
The camera’s angle can be slightly adjusted to fit your flight style. In addition to the onboard FPV camera, you can install on top an ultra-light camera for video recording. As the KT20 has a mini GoPro mount (smaller than the standard one), I had to modify my existing Insta360 Go 2 mount in order to be able to use it.

Despite its small size, the HGLRC KT20 is equipped with a high-power 5.8GHz FPV transmitter. The broadcast power of Zeus Nano VTX can be toggled between 25, 100, 200, and 350mW even remotely via SmartAudio and BetaFllight OSD. The slim, boomerang shape module has an onboard microphone, configuration button, and 3 status indicator LEDs (Power, Channel, and Band).
If you plan to upgrade from analog to a digital FPV system, there is room for a Caddx Vista module but soldering will be required. The included FC manual provides the pinout and possible wiring diagram.
HGLRC KT20 – Initial setup
Firstly, you need to bind your transmitter with the receiver. According to the RX version you opted for, the procedure may vary. Usually, the process is straightforward and should take no more than 10 minutes. Initially, I wanted to bind it with my Jumper T-Lite transmitter, but due to some FrSky version incompatibility, the process always failed. The second try was with a Taranis Q X7 radio which paired instantly with the KT20. The binding steps were described in the included R-XSR’s user manual.

The next step is to connect with the BetaFlight configurator and make the desired settings, such as channel mapping and OSD customization. For now, I did not make any PID adjustments.
Flight experience
The KT20 is not nimble as the Petrel 120x Pro, but still fun to fly around the house. It is gentle and easy to fly. Thanks to the 360degree blade protector it is also suitable for indoor practice. Till you give some throttle it is very silent, but at 40-50% (hovering level) is damn noisy.
While many like the pusher design, personally I didn’t find any advantage of it. During winter, you will be surprised if you land on snow, as the props push all the snow inside onto the electronics (FC + VTX).
The colors provided by the Caddx Ant camera are relatively natural but in terms of light level changes and when it faces the sun, the camera could provide a better visual experience.
You can expect about 3 minutes of flight time with a 4s/650mAh battery and around 4-5 minutes with an 850mAh one (with a GO2 camera on top). For crossing and longer flight time, you can use up to 1100mAh batteries.

